Hunting Headwinds

  • Trips
  • Gear
  • Conservation
  • About
Vu1dgS0Gwd9sF56H4XQyRJ5BN2VKE91uIJ3aCcsN-Loz80scKWU6zB1QwzUSqq-4NLhMUGNOBAH4r_DLSUA3Oy_GRfXc7VnGyPrOOa4Z8Tbotp1ZujB-Av6O4Pg7pLdQfivF49T9vS3fgndAI1NrX__X4qNCSa8s2j64bCbUenvDwLK5qOeS8-qjQ0gugi7_HFUFL_0ygL7DAuu2aBqxOWGfB2URU.jpg

Dutchware Chameleon Hammock

March 01, 2020 by Andrew Godfrey in Gear

I switched from a tent to a hammock in 2012 and never looked back.

There are times where you need a tent. Above the tree-line, deserts, tons of islands on Georgian Bay. So depending where I am, I’ll bring one just in case. But once you get comfortable sleeping in a camping hammock it’s very unlikely you’ll go back unless you’re forced. Here are a bunch of reasons why:

  • It’s lighter. Hammock/tarp rigs keep weight and bulk down.

  • Rain sucks less - you’re off the ground.

  • Tons of storage underneath you. It’s like having two storeys.

  • It’s comfier, no matter how you sleep - back, stomach, side. In an asymmetrical hammock, lying diagonally means you’re pretty much flat.

  • You get to sleep alone, 50 feet away from your buddy that snores like a chainsaw.

I’ll admit that there’s a ton more variability involved with hammocks. You want the right trees, the right diameter, the right distance apart. The right insulation (spoiler: a regular sleeping bag isn’t enough). But it’s worth all the complexity.

Quality rain protection.

Quality rain protection.

Just like with coolers, there’s an outspoken hammocking community online. Lots of cottage companies, and some big ones. Ultimately you need a handful of things to be successful with hammocks. I could spend a post on each of them, but in the interest of brevity here the summaries.

  • A tarp - You can go all the way from the blue Canadian Tire classic, up to custom silnylon tarps designed specifically for the length of your hammock. Ideally you want an extra 6” on either side for wind/rain coverage. 

  • Insulation - Without the ground for insulation, you need something under the hammock to keep you warm. Either a sleeping pad stuffed in the hammock with you, or an underquilt - a sleeping bag that goes underneath the hammock, outside. 

  • A hammock - Thin as you can for your weight. Some have an extra layer of nylon that lets you slip your sleeping pad in between, which is nice, but I recommend an underquilt. Having a fully detachable bug-net gives you some flexibility to use the hammock more casually.

  • A suspension - How you connect your hammock to the trees. For your first hammock, just get straps and carabiners. There are all kinds of other suspensions but they’re complicated. You’ll want to watch some Youtube videos on hang angles to maximize comfort - try it out at home a bunch before your first trip.

  • A bunch of cord, and pegs. You want cordage that doesn’t slack when wet. Basic paracord is okay, reflective is better, but Dyneema-based cord is best. Get lots of it - it’s super light. I would suggest 50ft (6ft x2 for the long ends of the tarp, 6ft x4 for the tarp corners, extra just in case).

If you’re looking for a quality hammock to start with, look no further than the Dutchware Chameleon.


The Good, The Bad, The Ugly

The Chameleon is a super versatile piece of equipment. Immense flexibility on type and colour of material, thickness, and accessories. When you consider the cost of the hammock and all the other items I listed above, the cost will generally come out to be the same as a nice brand name tent.

Quality views with the detachable bug-net removed.

Quality views with the detachable bug-net removed.

Dutch’s manufacturing is excellent, too. Quality materials (think fabric, zippers, cordage) and well-sewn. I haven’t run into any issues that would put me at risk of a structural failure.

My only qualms come from the inherent customizability of the hammock itself. My underquilt wasn’t built by Dutch, and because there are fixed hooks on the hammock it means the two pieces of equipment don’t perfectly match up. If I was able to shuffle them around, I’d get a better fit.

Likewise, the removable bugnet makes for a great daytime-hammock, but it leaves very small holes on either end where (theoretically) bugs could get it. I haven’t seen it happen, because when taut the holes all but disappear, but it’s still a possibility.


The Results

This is an awesome piece of equipment, and would be a great starter hammock. It’s not overly expensive, wait times are non-existent (which can’t be said of some other cottage manufacturers), and you can customize it to your size and needs. Best to get a simple suspension to start, and branch out from there. If you really hate how hammocking feels, there are lots of online communities where you can sell your gear second hand.

A hacky hang on the Bustard Islands.

A hacky hang on the Bustard Islands.

I also recommend getting the peak shelf to store night-time gear, but it seems like Dutch has a come up with a few new tricks since I bought mine.

Pros

  • Hammocks are great for all the reasons I listed above, and the Chameleon has the most versatility of any of them.

  • The materials and manufacturing are super high quality.

  • It’s cheap enough that if you find out you don’t like hammocks, you haven’t spend an absurd amount.

Cons

  • Hammocking is tricky in certain environments and you have to be prepared for that.

  • The Chameleon’s versatility can make using non-Dutchware accessories a challenge.

  • The peak shelf is good, but not great.

  • I suppose you’re basically like a pre-wrapped burrito if a bear decides it wants a snack.

March 01, 2020 /Andrew Godfrey
sleep, hammock, tent
Gear

The Icemule Boss Cooler

July 15, 2019 by Andrew Godfrey in Gear

Scouring the internet, I’ve realized there’s an obsessed community for everything. When I started looking for a way to keep food (and beverages) cold on trip, I found there’s one for coolers too.

Armed with temperature guns and digital thermometers, there are folks who have put every cooler out there to the test. The big name is still Yeti (good on them for some effective marketing), but there are other players with competitive products that have generated fierce loyalties. Pelican, Orca, and RTIC come to mind. Some of these coolers are hilariously expensive - especially compared to the $30 Canadian Tire special we all know and love. We’re talking prices well above $500.

The Classic.

The Classic.

I’ve always avoided bringing coolers on trips. Portaging is a nightmare, ice doesn’t last, and you’re stuck lugging the thing around even when the food is gone. Then I started to see companies coming up with innovative designs that had me wondering whether I could find one that works for the backcountry. I set my requirements and started hunting:

  • I want to be able to keep food frozen for 3+ days

  • I want to be able to carry the cooler around easily

  • I want it to be rugged enough to handle being tossed onto rocks/off a boat/out of a moving car

I found that the main distinction in coolers is hard shell or soft shell. Good hard shell coolers are generally rotomolded, they can keep food frozen for over a week, they’re super rugged, and they weigh an absolute ton. 20 pounds plus is normal for the cooler alone. Good soft shell coolers can’t keep ice cold as long, they’re not as rugged, but they’re easier to haul around.

A typical hard shell rotomolded cooler.

A typical hard shell rotomolded cooler.

A typical soft shell cooler.

A typical soft shell cooler.

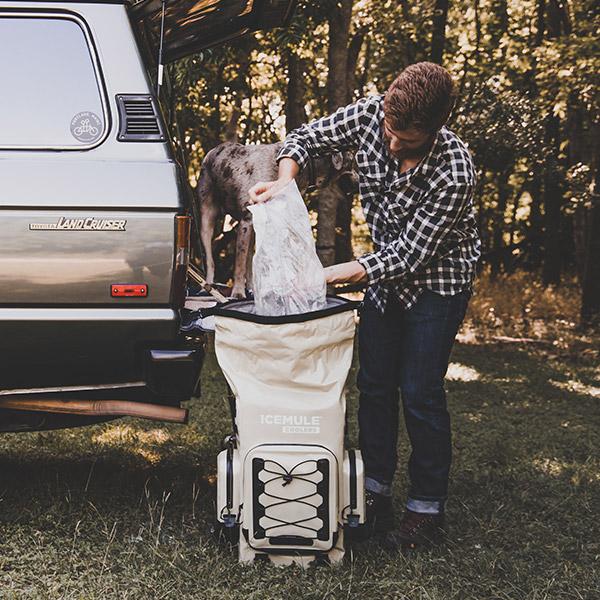
The Icemule Boss is an interesting balance. It’s a roll-top backpack with a hip-belt, weighs about 5lbs, has unusually thick insulation for a soft shell cooler, and claims to be able to keep ice for 5+ days. It can carry 30+ pounds of whatever you want to put in it. In terms of usable space, it can fit a 24-pack of beer cans on its side plus ice. Or food. If you’re into that.

Filling the Icemule Boss. (Pic from Icemule.com)

Filling the Icemule Boss. (Pic from Icemule.com)

The pack strapping. (Pic from Icemule.com)

The pack strapping. (Pic from Icemule.com)

The roll-top latching clip. (Pic from Icemule.com)

The roll-top latching clip. (Pic from Icemule.com)

So in the summer of 2018 I picked one up at the REI in Rochester for $300 USD. That STILL feels like a ridiculously high price for a cooler, but I’m a sucker. If you’re a sucker too, you can get it at Wayfair for $399 CAD plus tax (as of July 2019).


The Good, The Bad, The Ugly

I’ve run two real tests with this cooler so far.

A few weeks ago, I filled it with about five bags of grocery store ice and left it in the sun on my driveway, checking twice a day to see if there was ice. The temperature was anywhere between 15-25 degrees through the week. In that test it took the ice 5.5 days to melt, which honestly kind of blew my mind. This made the idea of having meat late into a trip possible.

1.5 days in: about 75% of the ice left

1.5 days in: about 75% of the ice left

2.5 days in: about 50% of the ice left

2.5 days in: about 50% of the ice left

4.5 days in: still three inches of ice and chilly water (brutal pic sorry)

4.5 days in: still three inches of ice and chilly water (brutal pic sorry)

So before my five-day Georgian Bay trip this year, we filled it with about 10lbs of frozen meat, filled the rest of the space with ice, and headed out on the water.

Long story short, it took the ice about 3.5 days to melt, so we still had frozen meat for our Day 4 dinner. I actually think we could have stretched it a bit further had we flash frozen everything - only two of the four meals were flash frozen, and the other two thawed much quicker.

Cooler strapped to the deck of my kayak - handled surprisingly well, and made a great backrest.

Cooler strapped to the deck of my kayak - handled surprisingly well, and made a great backrest.

The pack itself is great to haul around, and certainly easier than carrying a hard shell cooler by its handles. Even fully loaded (40lbs+ if you’re so inclined) it carries the weight well. Unfortunately for my size (6’ 3”), the nonadjustable hip belt is pretty much useless. The waterproof pockets have been useful, but it’s more space than I need so they’re just extra bulk.

Icemule’s only real competitor here is Yeti’s Hopper backpack. I haven’t seen any comparisons between the two, and haven’t tested the Yeti myself, so the only differences I can highlight are the ones I see. The Yeti has fewer pockets and has a zippered ‘lid-top’ versus a roll-top. The two are about the same price here in Canada as of July 2019.


The Results

This cooler is great. I’ve hauled it on trails, strapped it to a kayak, and I’m sure at some point will try throwing it out of a moving car. Honestly the only way it could be better for me is with an adjustable hip-belt.

I will say that if you bury a few cans of beer at the bottom, it can be kinda tough to dig them out because it’s such a tight space. But that’s an acceptable price for a cold beverage 3-days into a camping trip.

Cons

  • One-size-fits all means the hip belt might be useless to you too

  • More pockets than I need, so it’s bulkier than it could be

  • The rigid walls and tight space inside the cooler make it hard to fit certain foods/drinks

  • People might make fun of you for buying a $400 cooler

Pros

  • Phenomenal ice retention

  • Rugged and easy to carry

  • Waterproof pockets and webbing mean it might be the only pack you need for a day trip

Rating: Treat Yourself

July 15, 2019 /Andrew Godfrey
Cooler, Icemule
Gear
cf-lg-7723cfb6-c11b-4761-a41e-96dd0983e10e.jpeg

Garmin inReach Mini - GPS and Satellite Messenger

July 14, 2019 by Andrew Godfrey in Gear

On the last day of a recent winter camping expedition, we got back to our cars a couple hours later than we planned. It left my family and friends a bit anxious, so I decided it was time to bite the bullet and get a satellite communicator. I figured it would be a good way to keep in touch, and could even use some of the other GPS features for route planning and tracking.

In my research, I was surprised to find that there aren’t a lot of players in the space. Garmin dominates the industry, followed by SPOT, and then a couple of new entrants. For better or worse, this made searching for products a bit easier simply because there just aren’t a lot of options out there. I set a list of requirements and started hunting:

  • I wanted to be able to send (and possibly receive) messages in places where I won’t get cell signal

  • I wanted to be able to share locations and waypoints along my journeys

  • I wanted to be able to do some rudimentary route planning ahead of time

  • I wanted to be able to track my progress on the the trip itself

  • Ideally, I wanted to monitor weather conditions on-demand

With those requirements, there are really only a handful of solutions available and I immediately starting seeing a buzz around Garmin’s new line of inReach products - the Explorer+, SE+ (essentially two models of the same device), and the Mini. The inReach hardware/software ecosystem came to Garmin via the acquisition of Delorme in 2016 and, as Delorme products, had strong reviews.

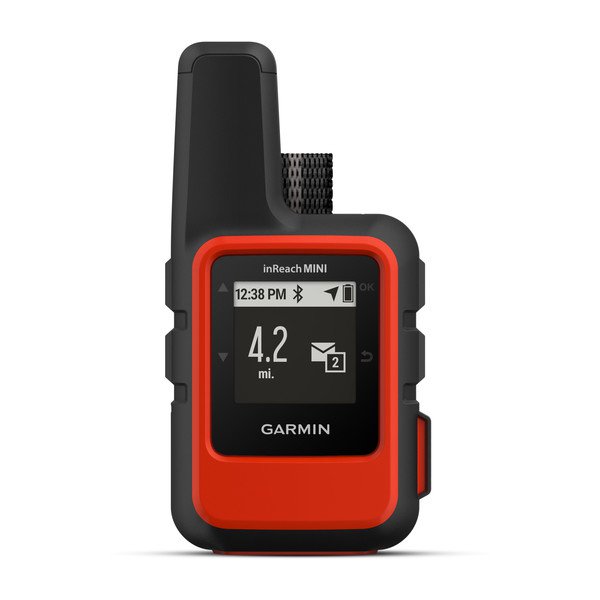
Garmin inReach Mini

Garmin inReach Mini

Garmin inReach SE+

Garmin inReach SE+

Garmin inReach Explorer+

Garmin inReach Explorer+

So I picked up the Explorer+ and started playing around. The device cost me $590 plus tax (in January 2019), and the monthly subscription required to access messaging, SOS, and tracking features was another $45/month plus tax.


The Good, The Bad, The Ugly

Maybe it was my lack of familiarity with using GPS, but right away I found the experience to be super clunky. The menus weren’t intuitive, and every action felt like it took three more clicks than it should have. Likewise the integrations to the browser-based planning tool and accompanying mobile app were inconsistent and equally complicated. I let out a deep sigh when I realized there are no fewer than five tools that you have to interact with to get the most out of your device (the hardware itself, the inReach browser app for planning, the mobile app for communication and tracking, the MapShare browser app for friends/family to see your routes, and the desktop app required to sync firmware to your device).

Earthmate App - Map View

Earthmate App - Map View

Earthmate App - Track View

Earthmate App - Track View

Over the winter, I probably spent two hours on the phone with Garmin product support trying to wrap my head around how to use this thing: how to import maps, waypoints, and routes; how to actually use the (pretty brutal) web app to isolate those maps, waypoints, and routes to reduce clutter; how to troubleshoot when something isn’t working as expected. Because of inconsistencies in the experience across the applications, none of this is very intuitive.

inReach Browser App (*shudders*)

inReach Browser App (*shudders*)

I realized quickly that the Explorer+ was overpowered for my needs. I could do downsize to the Mini, use that device to initiate tracking and messages, and do all my map viewing on the mobile app (which I don’t really need to do on the water anyways). I returned the Explorer+ to MEC, traded it for a Mini, and got $140 back. (FYI - subscriptions are the same price regardless of what device you use)

I will say that the hardware itself is impressive and super functional once you understand how the whole ecosystem fits together. It’s waterproof, rugged, uses about 1000mAh of power per charge (based on my tests), and is remarkably easy to use considering there are only four buttons to navigate the menus and features. You won’t want to use it to type anything more than a few words, but for that you can just connect to your mobile app and do the heavy lifting there.

After feeling like I finally navigated the chaos, I brought it out on my first trip this past week.


The Results

On trip, the inReach Mini and Earthmate app did everything they were supposed to. And somewhat impressively, the device lasted nearly four days on a single charge (tracking our routes for a few hours each day, logging locations every 10 minutes and broadcasting it every 30 minutes). I was able to send custom and preset messages, was able to retrieve detailed weather reports quickly, and was able to monitor our progress against our route. My friends and family were able to use MapShare to see all the data clearly, and were happy to be able to follow along.

MapShare browser app - check out my latest track here. Password is trek

MapShare browser app - check out my latest track here. Password is trek

The only missing feature, for me, was the ability to adjust routes on the fly. I was essentially stuck with whatever I had synced via the browser app - so there was no way to make changes during the trip.

Despite the ridiculously clunky software experience, I’m pleased with how the device performed and am eager to take it out on another adventure.

Pros

  • Impressive battery life (but bring a back-up power pack just in case!)

  • Good size, rugged, and has a functional hardware interface

  • Fast and reasonably intuitive messaging and weather requests/responses

  • The MapShare tool for sharing routes, tracks, and locations with friends and family is great

Cons

  • The browser and mobile app interfaces are frustratingly bad. Managing waypoints, routes and tracks in meaningful ways is effectively impossible. Filtering and exporting the right information is hard to do right without significant trial and error.

  • You can’t build new routes using the device or mobile app, so you can’t make changes without accessing a browser.

Rating: Functional and frustrating


Pro Tips

  • The device seems to use a lot of extra charge trying to find a clear GPS signal. If you’re not using it, turn it off. Bring a back-up power pack if you’re out longer than a few days.

  • Because of how clunky Garmin’s software is, consider using Google Earth to plan your routes and waypoints, export the KML file, and import that directly into the inReach browser app.

  • Take it on a practice run to make sure you did everything correctly - even just to a park or down the street. If you set it up incorrectly, you won’t be able to fix it out in the woods.

July 14, 2019 /Andrew Godfrey
Garmin, GPS, inReach
Gear
Comment